

How to create the perfect BASE tan for Fitness or Dance Competition Tanning.
By Brooke O’brien
It’s March, and we are back in swing with Competition Tanning.
Having completed well over 1000 tans for fitness and dance competitions, I know a thing or two about creating the perfect Base tan.
Firstly, what is a BASE tan? Base tan is the competitors desired colouring, and in most cases is more important then any top coat, glaze, or contest colour. The days of turkey glazed body builders are fast becoming extinct. These days, you are dealing with the rise and rise of fitness and sports models, where being naturally beautiful is as important as being dark and toned.
We all know that looking naturally beautiful is hard to do when it looks like you have been rolling in tar for 3 days. Sheer tanning application is the most important ingredient to creating the perfect base tan.
So, how do you create the perfect base tan whilst still allowing great colour depth? The secret is in the ingredients. Pure black based ingredients which magnify colouring under stage lighting is the key to creating the perfect BASE tan, and if you use the products and method below, you cant go wrong.
For best skin preparation, use PH Ready by fitness tan. Start using this product 2-4 weeks out from competition, it’s available in a handy 200ml at home size right here.
Step 1: Immediately before you start the spray tan, apply PH ready professional and allow this 5 minutes to set. Competitors all prepare differently, dieting, dehydrating, intense training these all have the ability to give differing results when tanning. PH Ready neutrilises these factors and allows for perfect colour development.
Step 2: Next, create a perfectly even first coat tan using Competition Level 3 by Fitness Tan. You don’t need to use crazy amounts of product, sheer is best. Simply ensure the product is flawlessley applied and evenly dispersed. If you use the Fitness Tan ALWAYS READY spray tan gun (coming soon!) , the hard work is done for you. It will apply flawleslly every time giving an airbrushed result, set the gun to level 4 or 5.
Step 3: You need a high powered salon quality hair dryer. You are not just drying the tan, you are opening the skins pores to allow deeper colour development on your next application. So without allowing the skin to sweat, dry the tan using the hair dryer heat, approximately 7-10 cm’s from the skin. Do this for about 5 minutes. Arms and legs will take longer for pores to open so spend more time on these areas.
Step 4: Immediately apply your second coat using Competition Ready level 3 by Fitness Tan. You can afford to be heavy with this application so if your using the Fitness Tan gun, turn it up to maximum (level 8). Competition Ready by Fitness Tan is designed to build colour, this coat will develop much darker based on the good work you have done with the first coat underneath. You will notice that product absorbs much easier into this skin due to the open pores from the previous step.
Step 5: Leave product on the skin for a minimum of 4 hours, you can sleep in it if you wish. Your first shower should be with cold water to not interrupt the tan, luke warm will be okay if you can not tolerate the cold.
Step 6: Asses your colouring 24 hours after initial application, if more colour is required then please repeat the above steps again the next day.

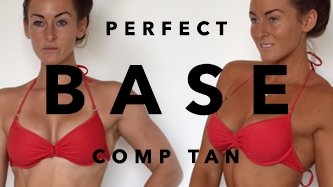
These pictures are of Melissa Le Mann, pro athlete and sports model. This is a Base coat for a sports model using the above technique once. Due to the nature of Fitness Tan product her colouring will magnify on stage, showing off her hard work with out having to layer on ridiculous amounts of products. In many Competitions, Top coat or day of contest colour is required. Top coat should compliment the BASE and once again should be sheer. Stay tuned for my next blog on Top Coat application and how to ensure the best results.